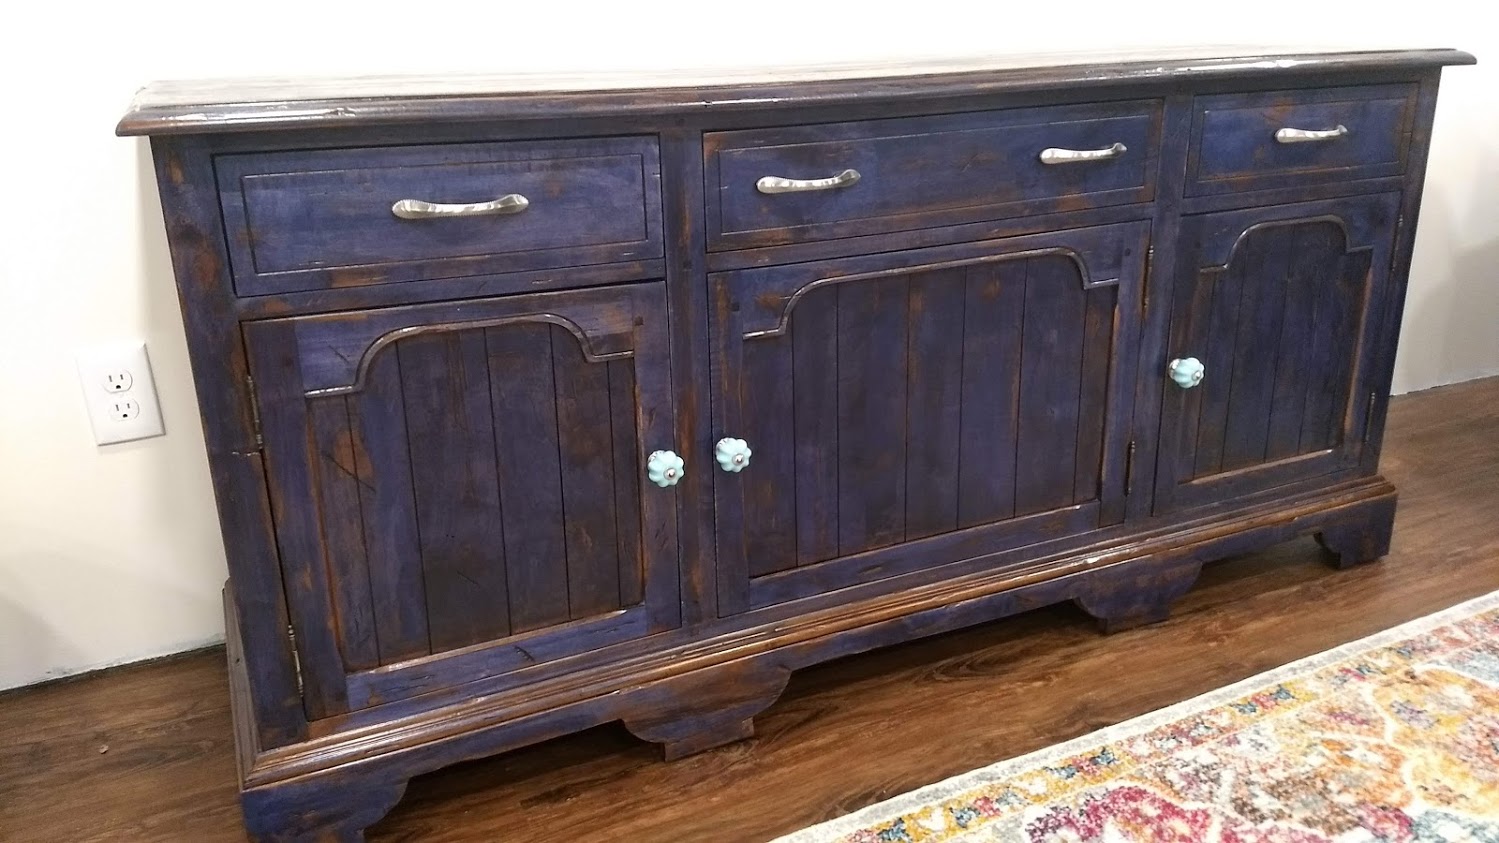
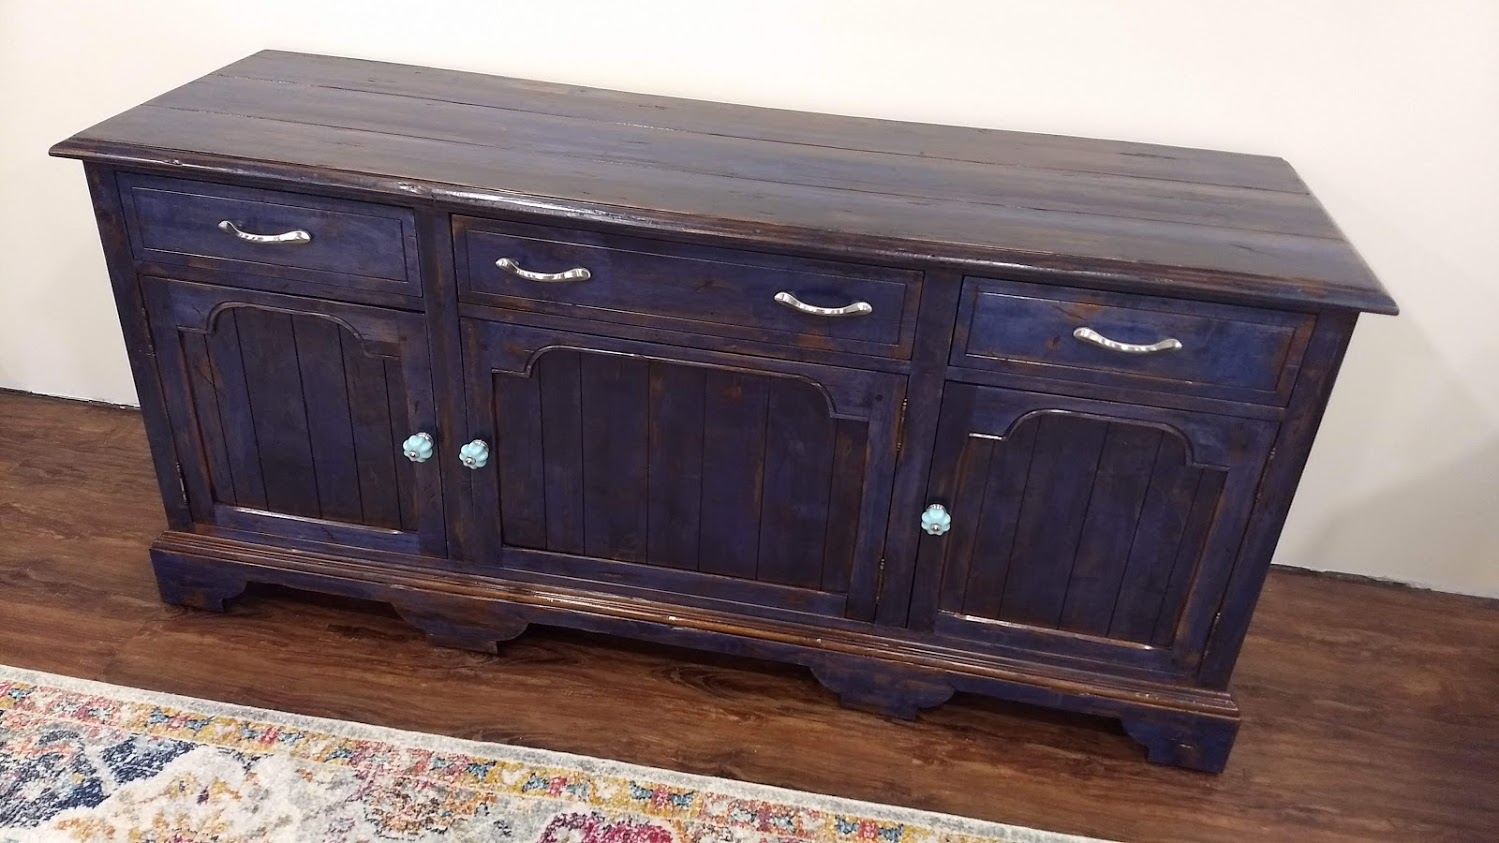
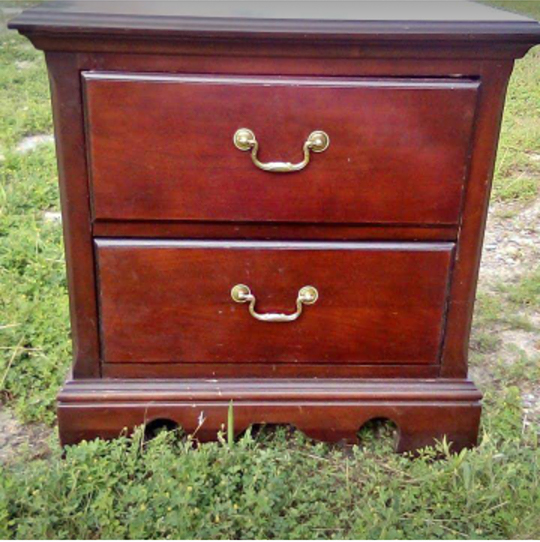
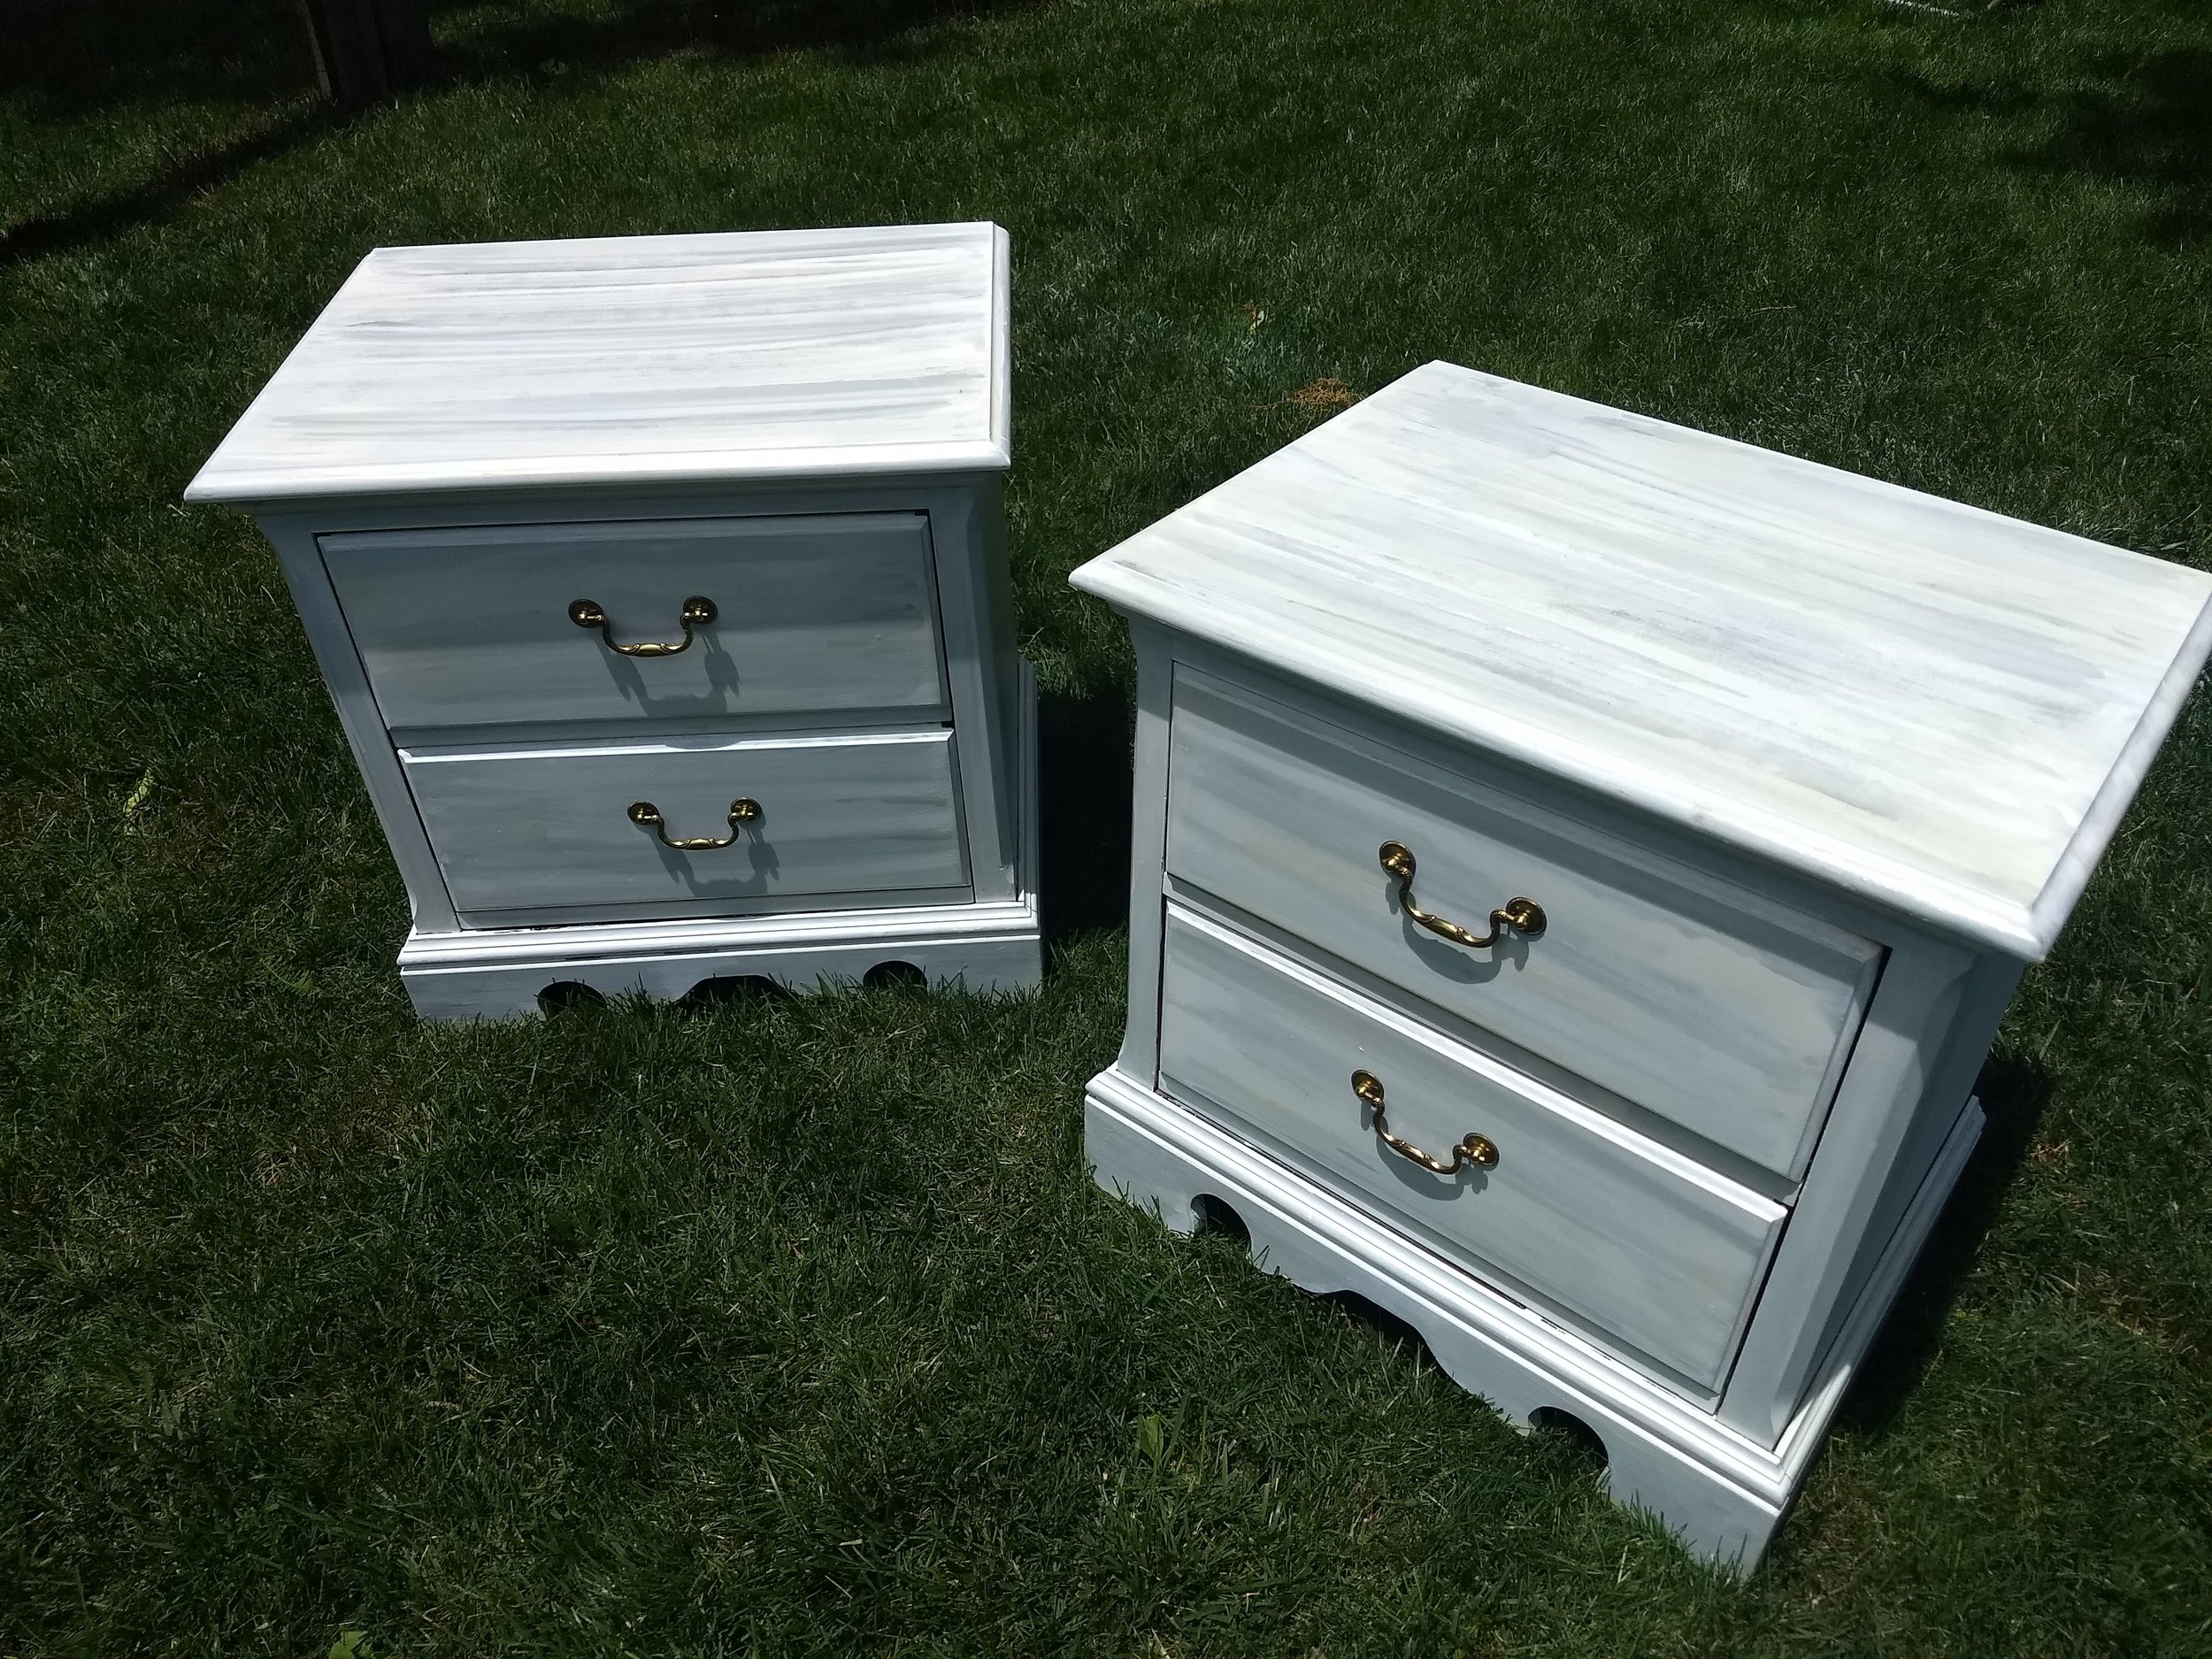
furniture transformation: whitewashing wood in 5 easy steps


IMG_20190620_085002419.jpg

1) disassemble

Take off all the hardware and remove the drawers. Lay the pieces on a dropcloth. I do a general tune-up on the piece here. Anything wiggles? Glue it and clamp it overnight. Any furniture tacks sticking out? Hammer them back in. This is also a good time to oil any drawer rollers with WD 40.

2) sand & clean

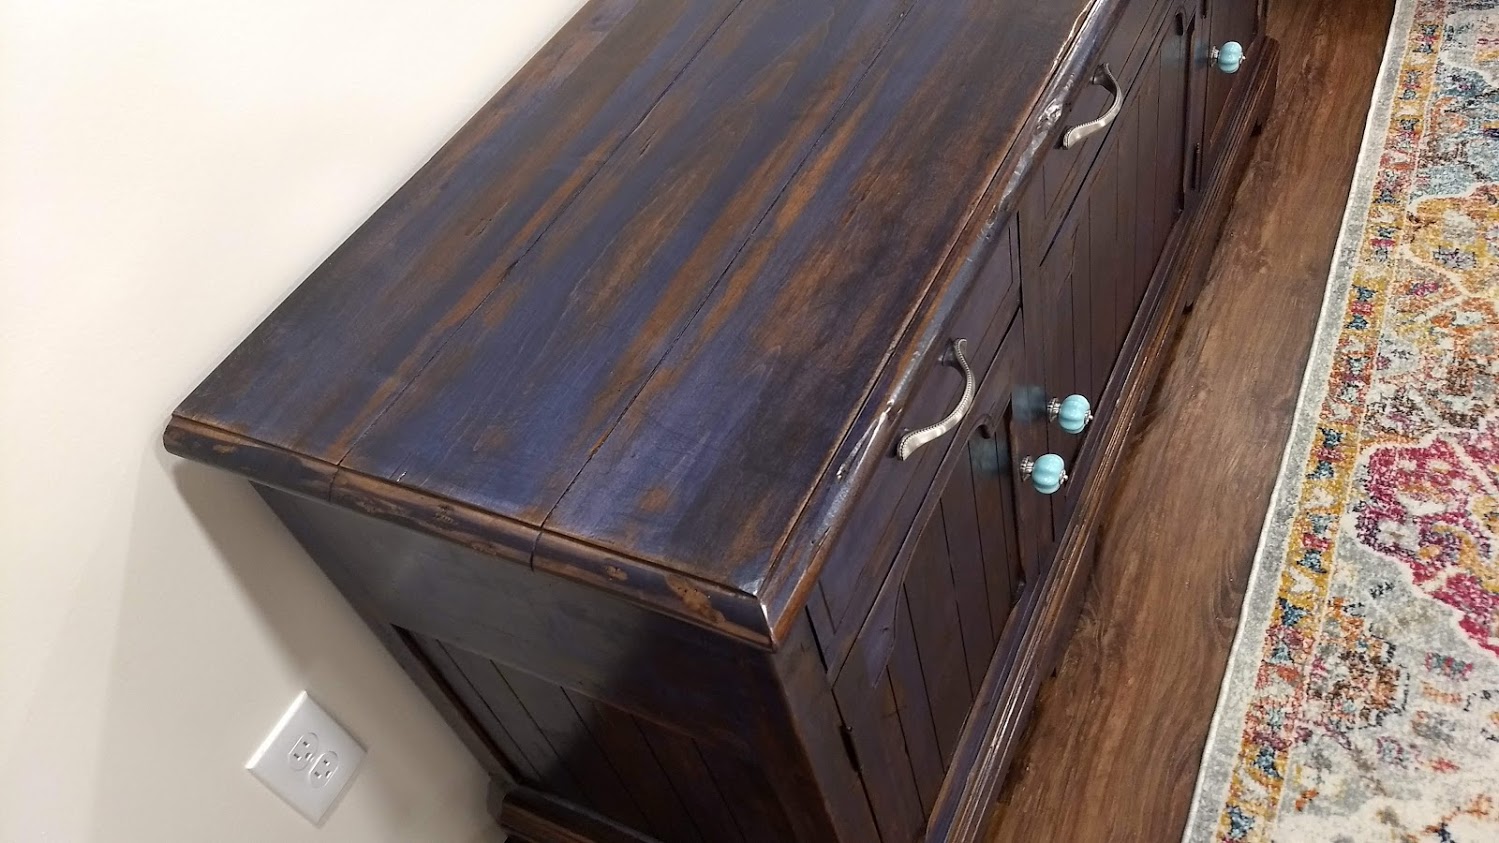
Use light sandpaper (I prefer a sanding sponge) to take off the top layer so the paint can adhere. Smooth out any cracked spots and remove any loose paint. Wipe it with a damp cloth.

IMG_20190620_174645877.jpg

3) whitewash

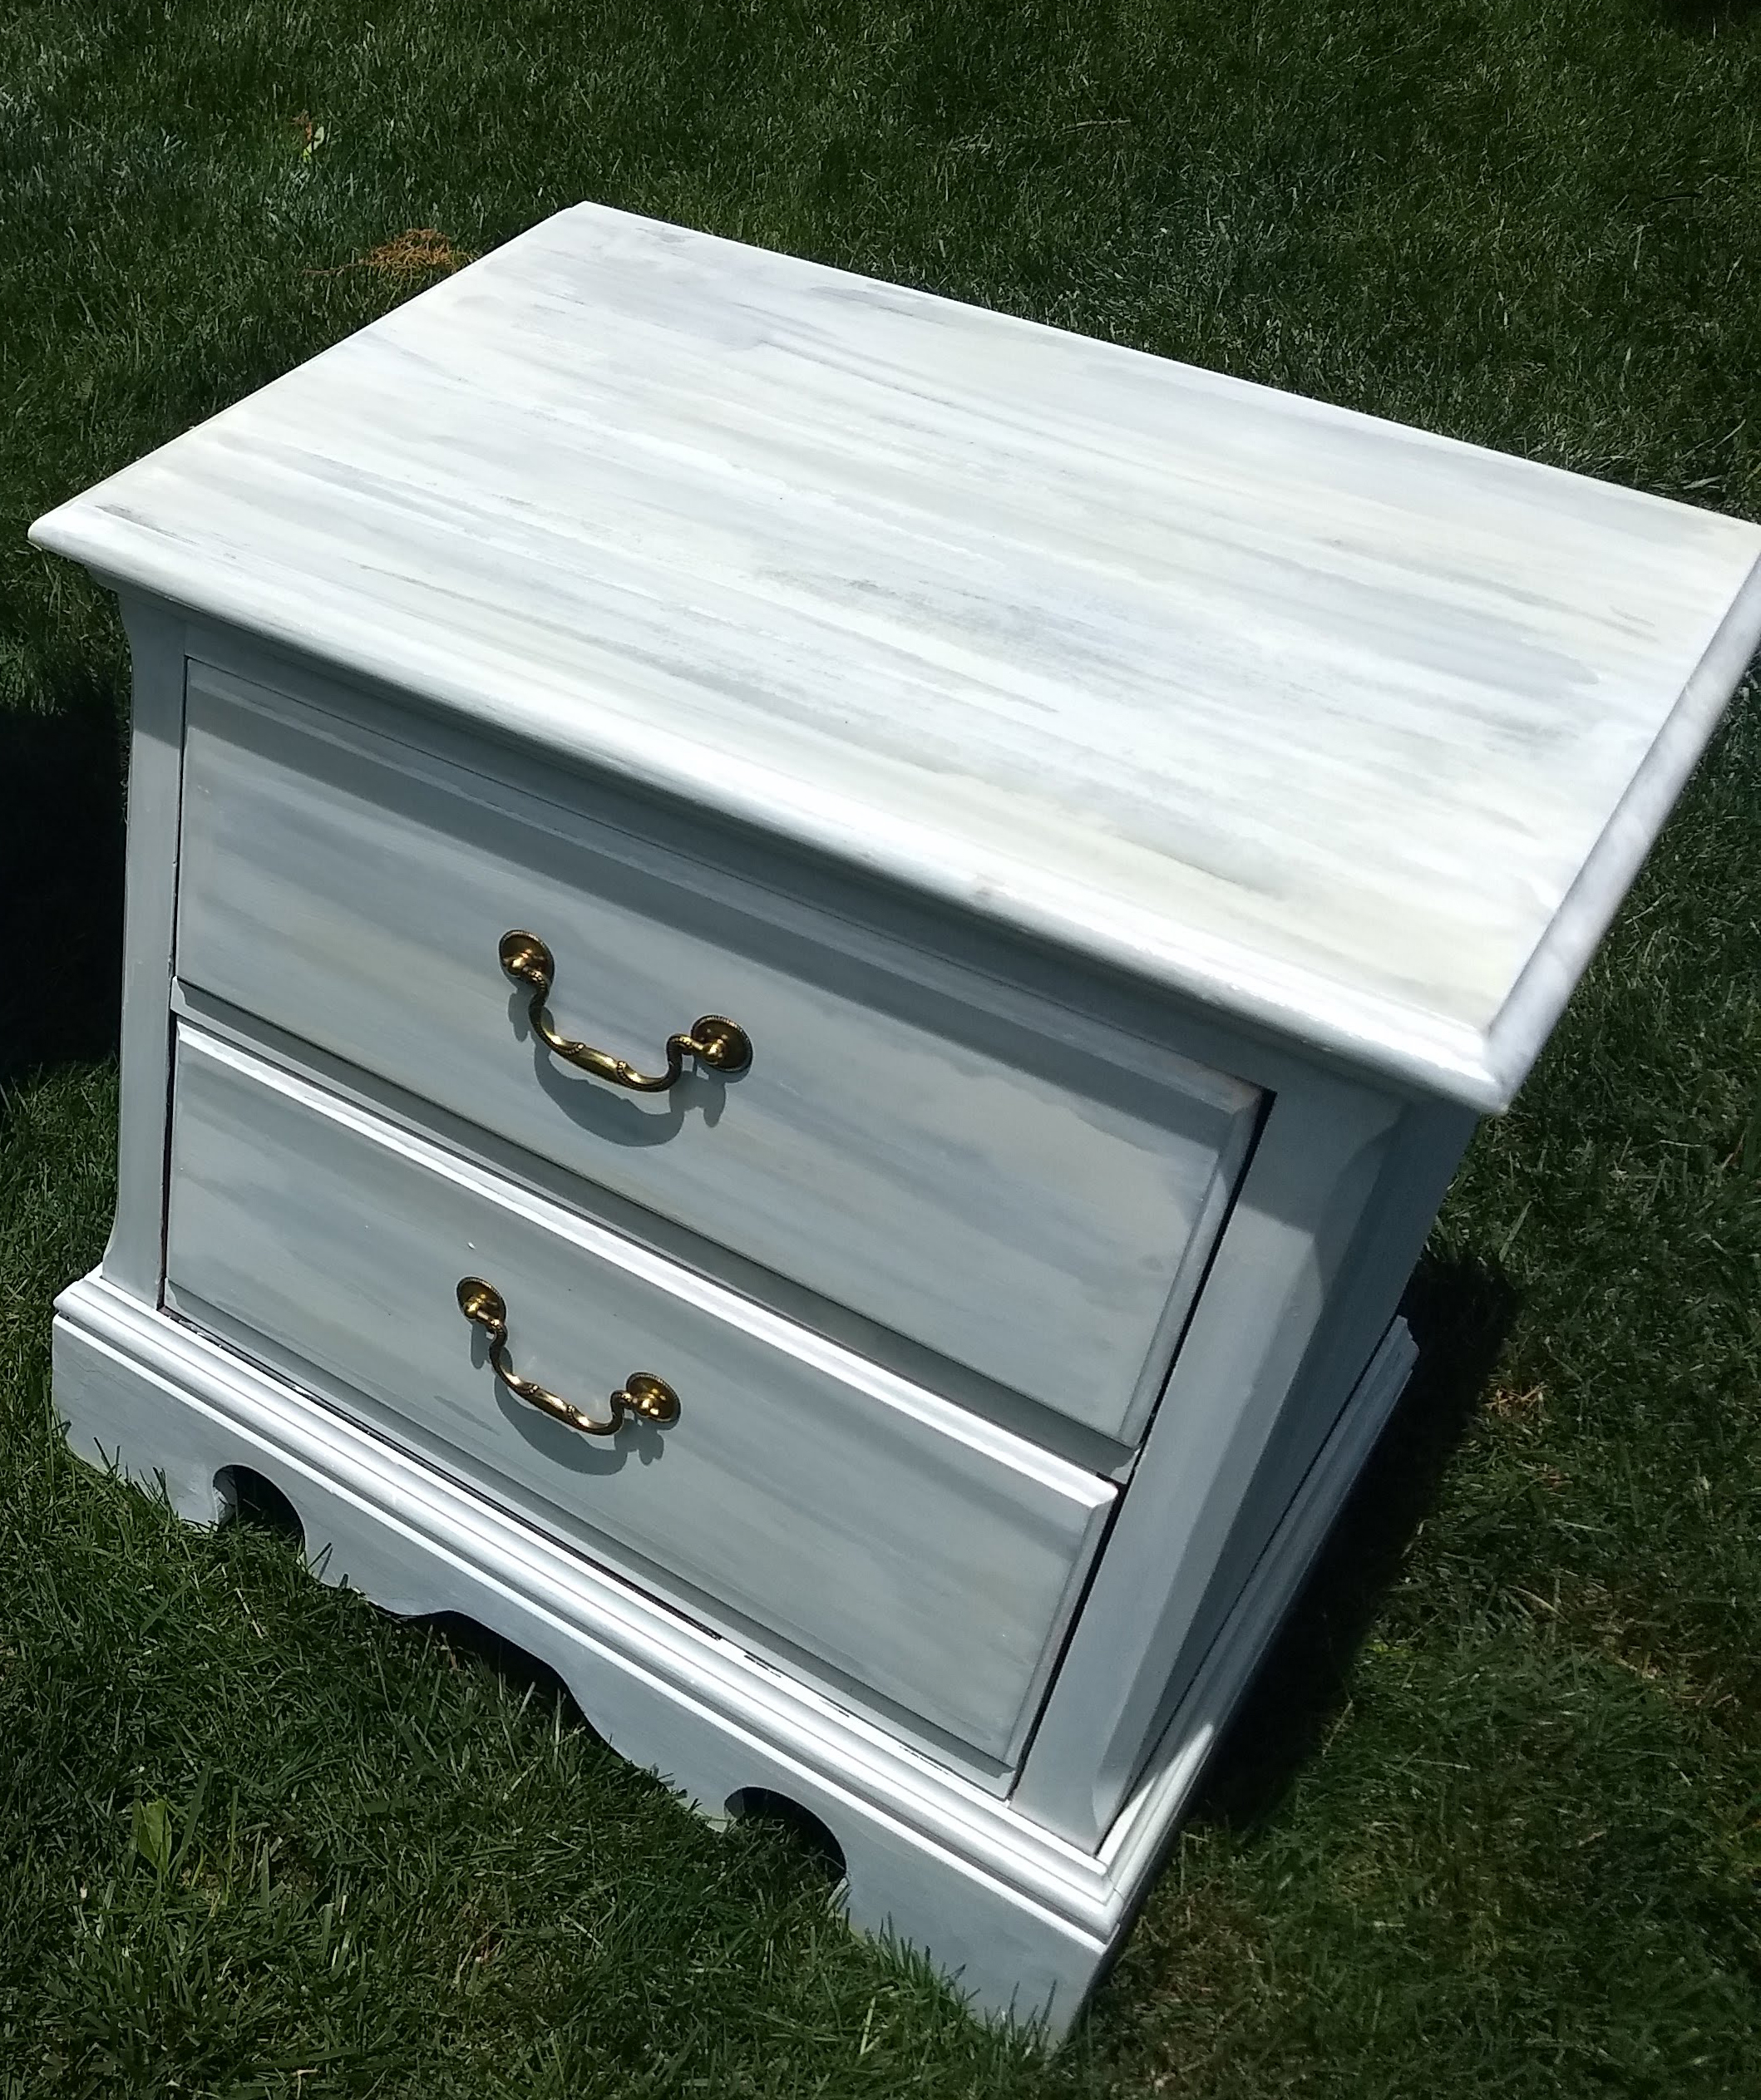
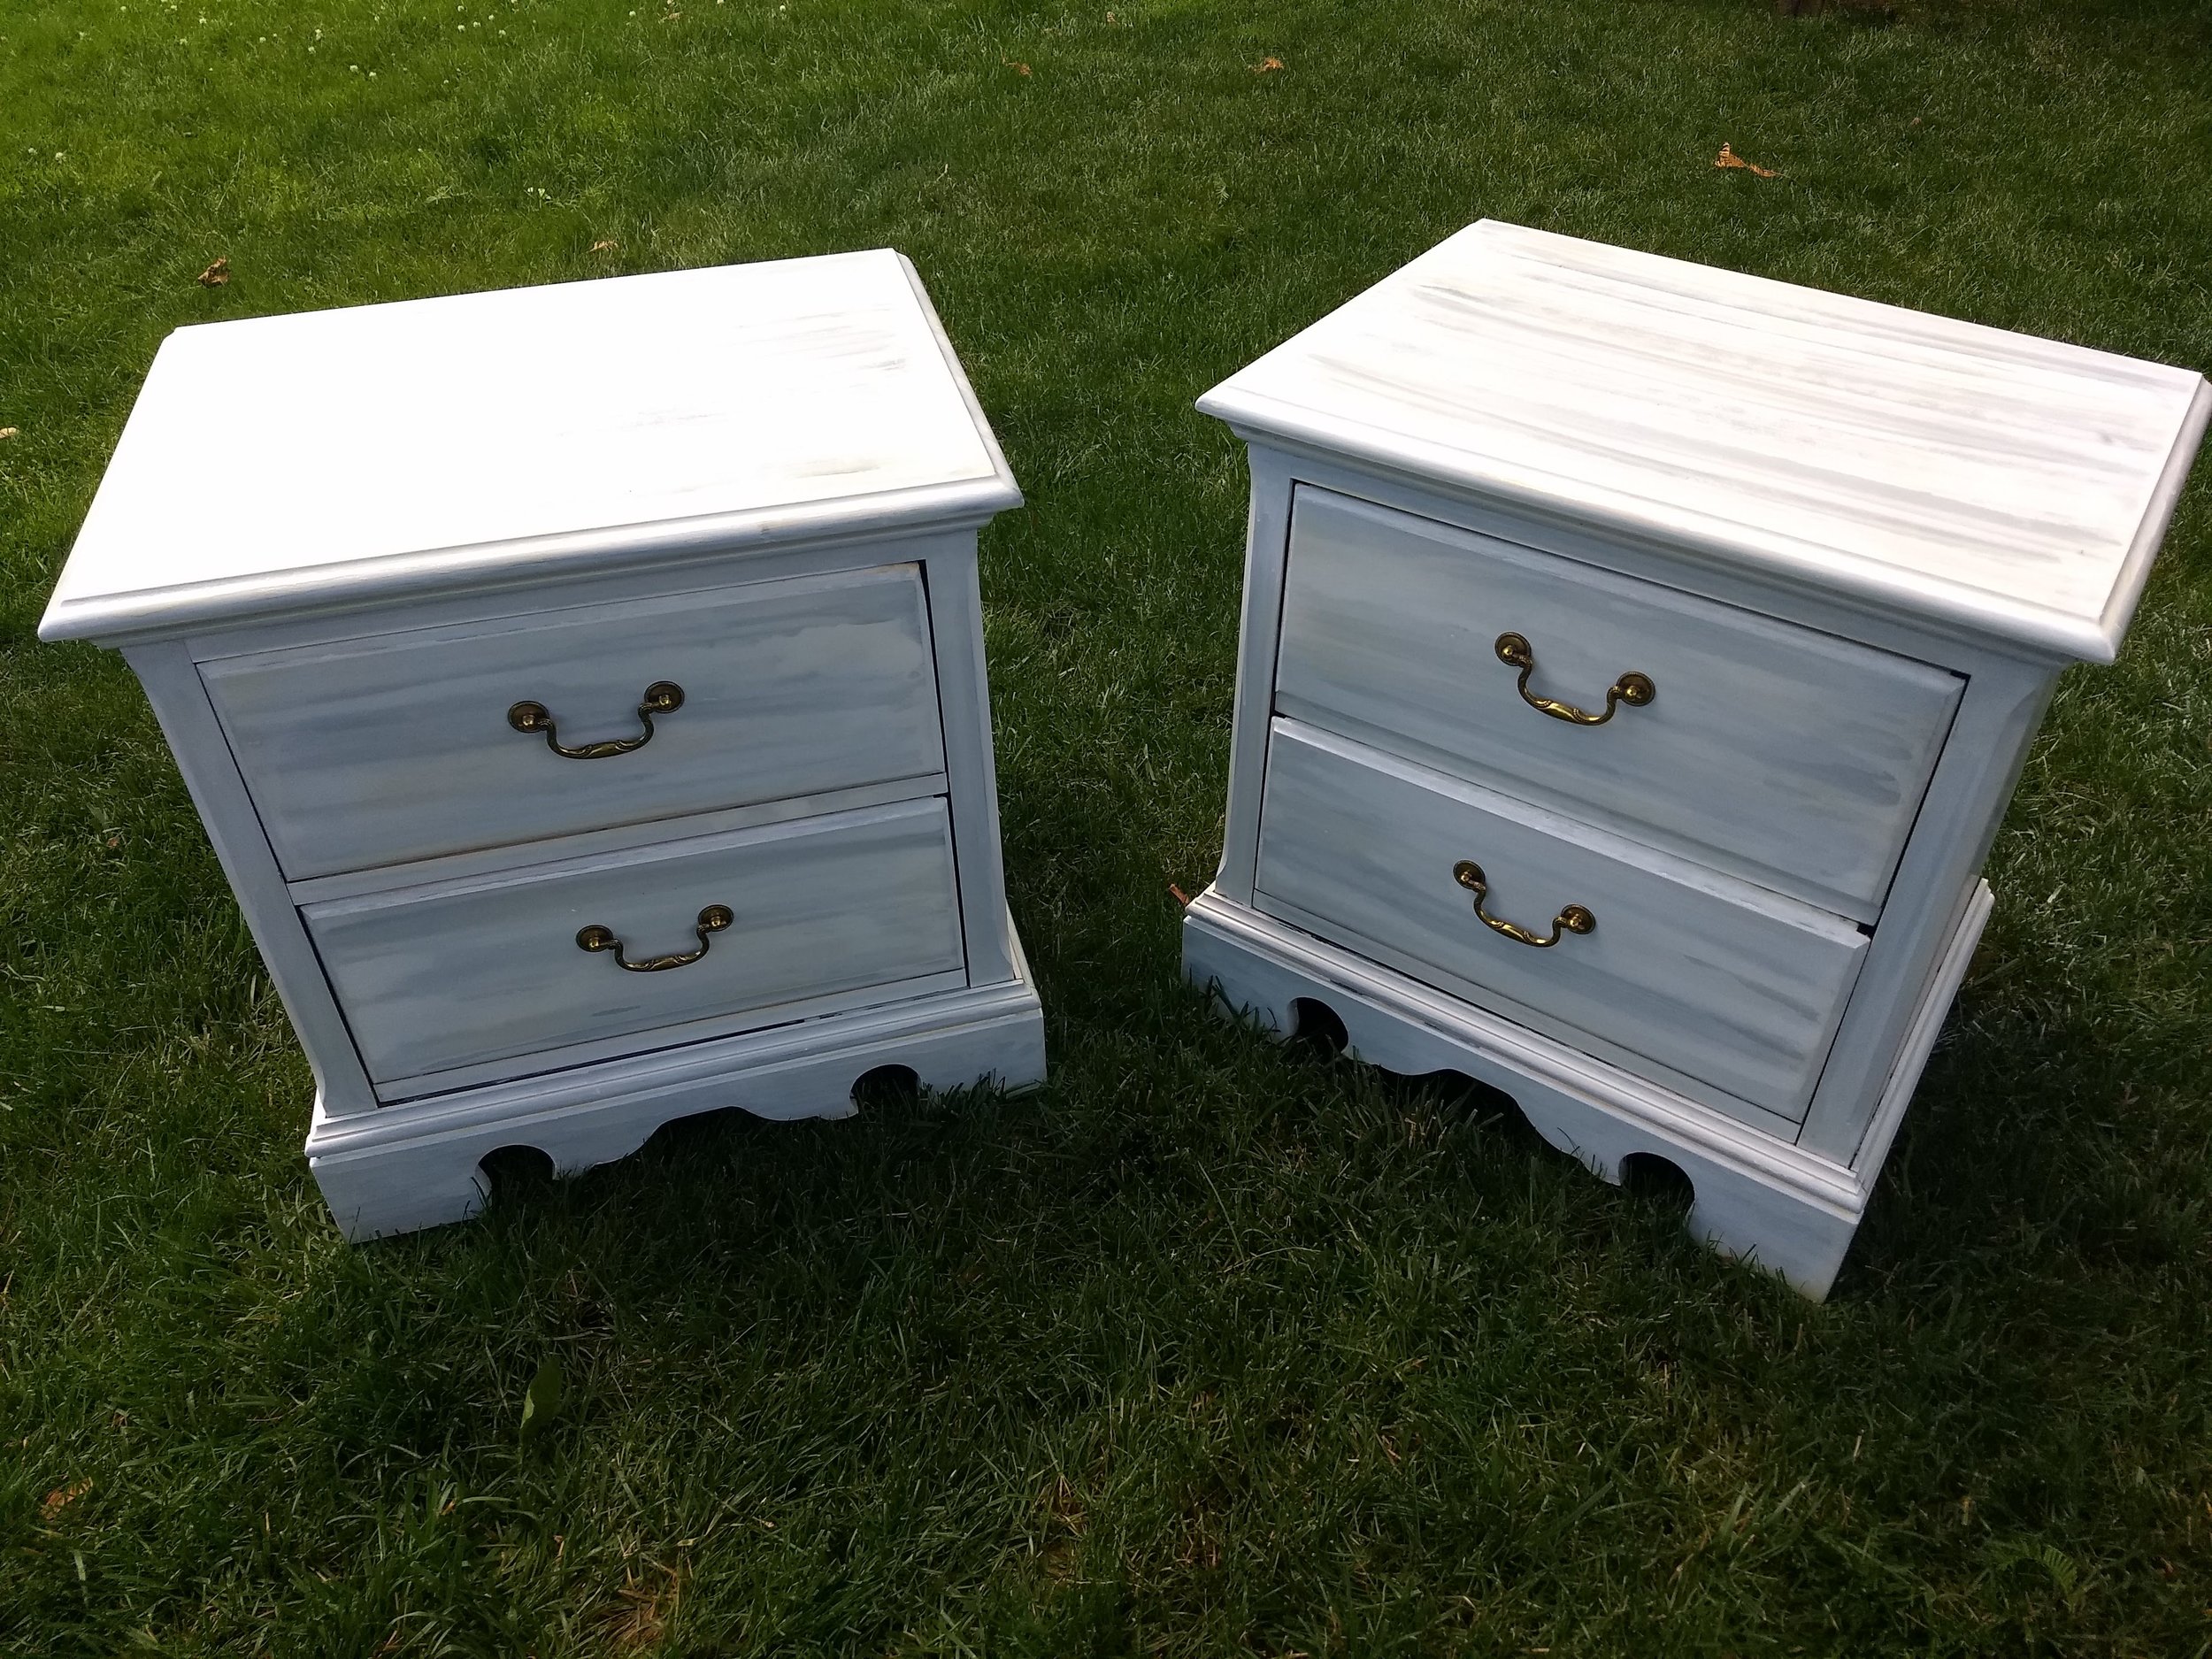
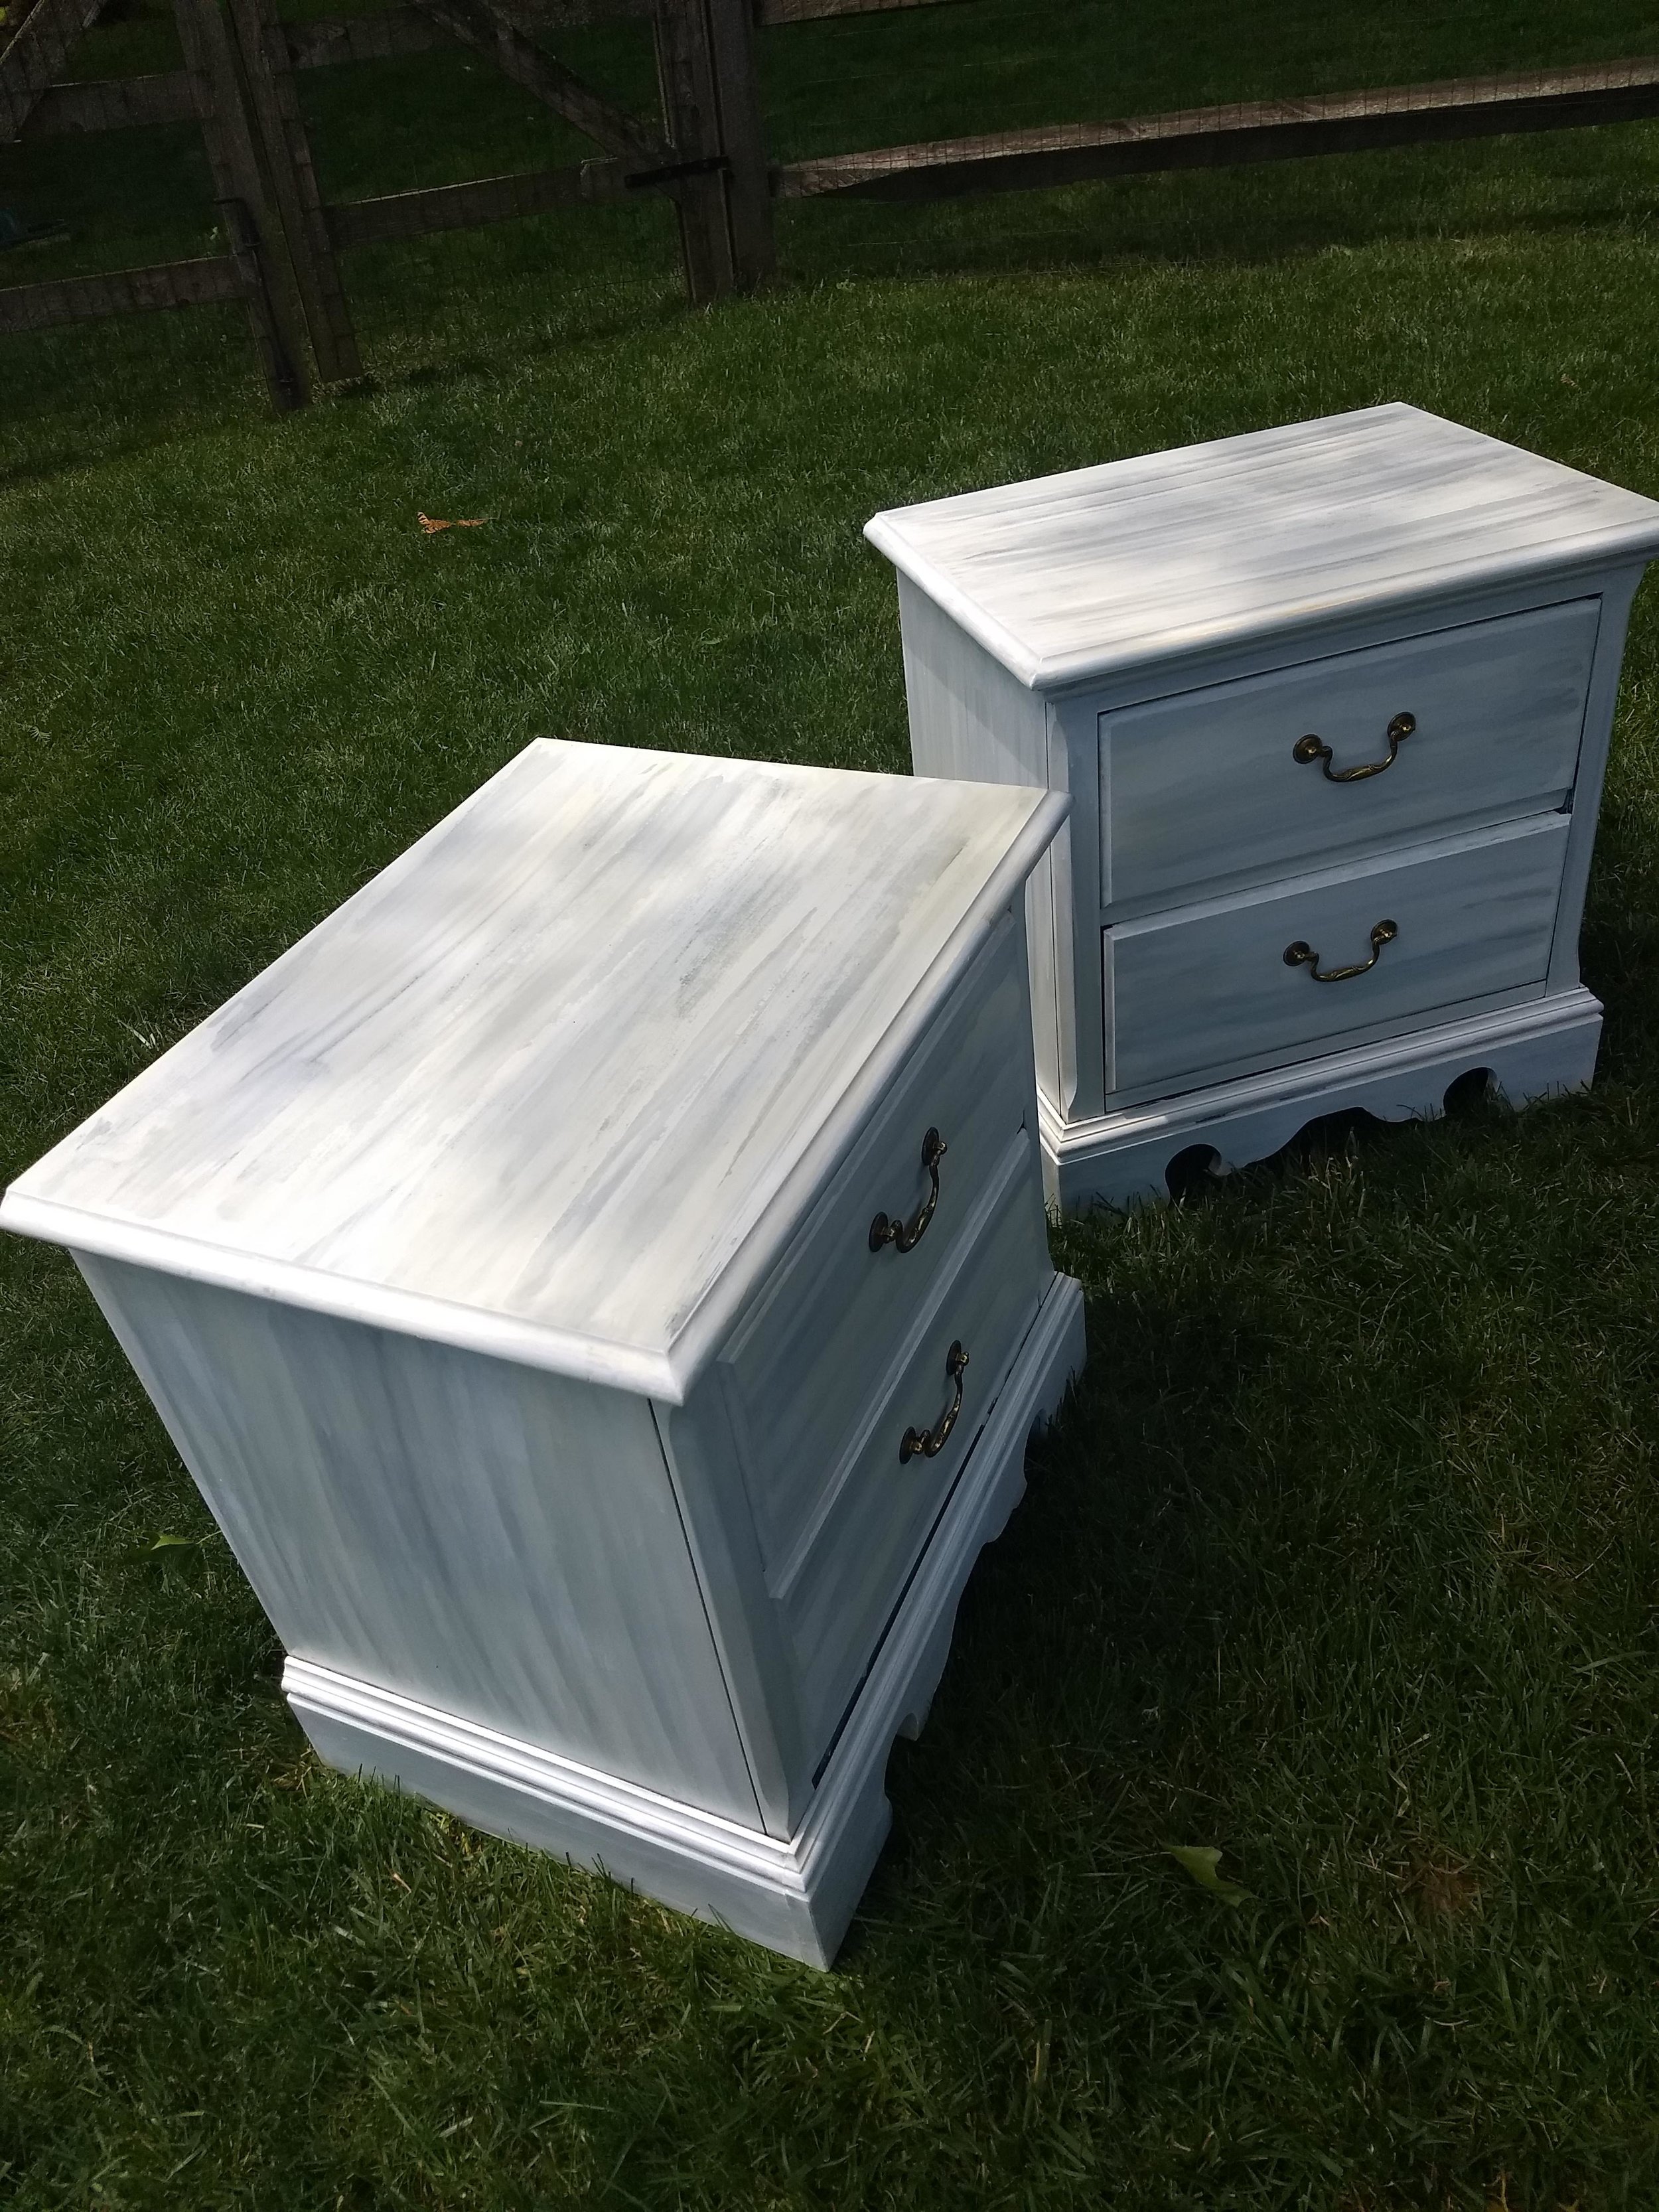
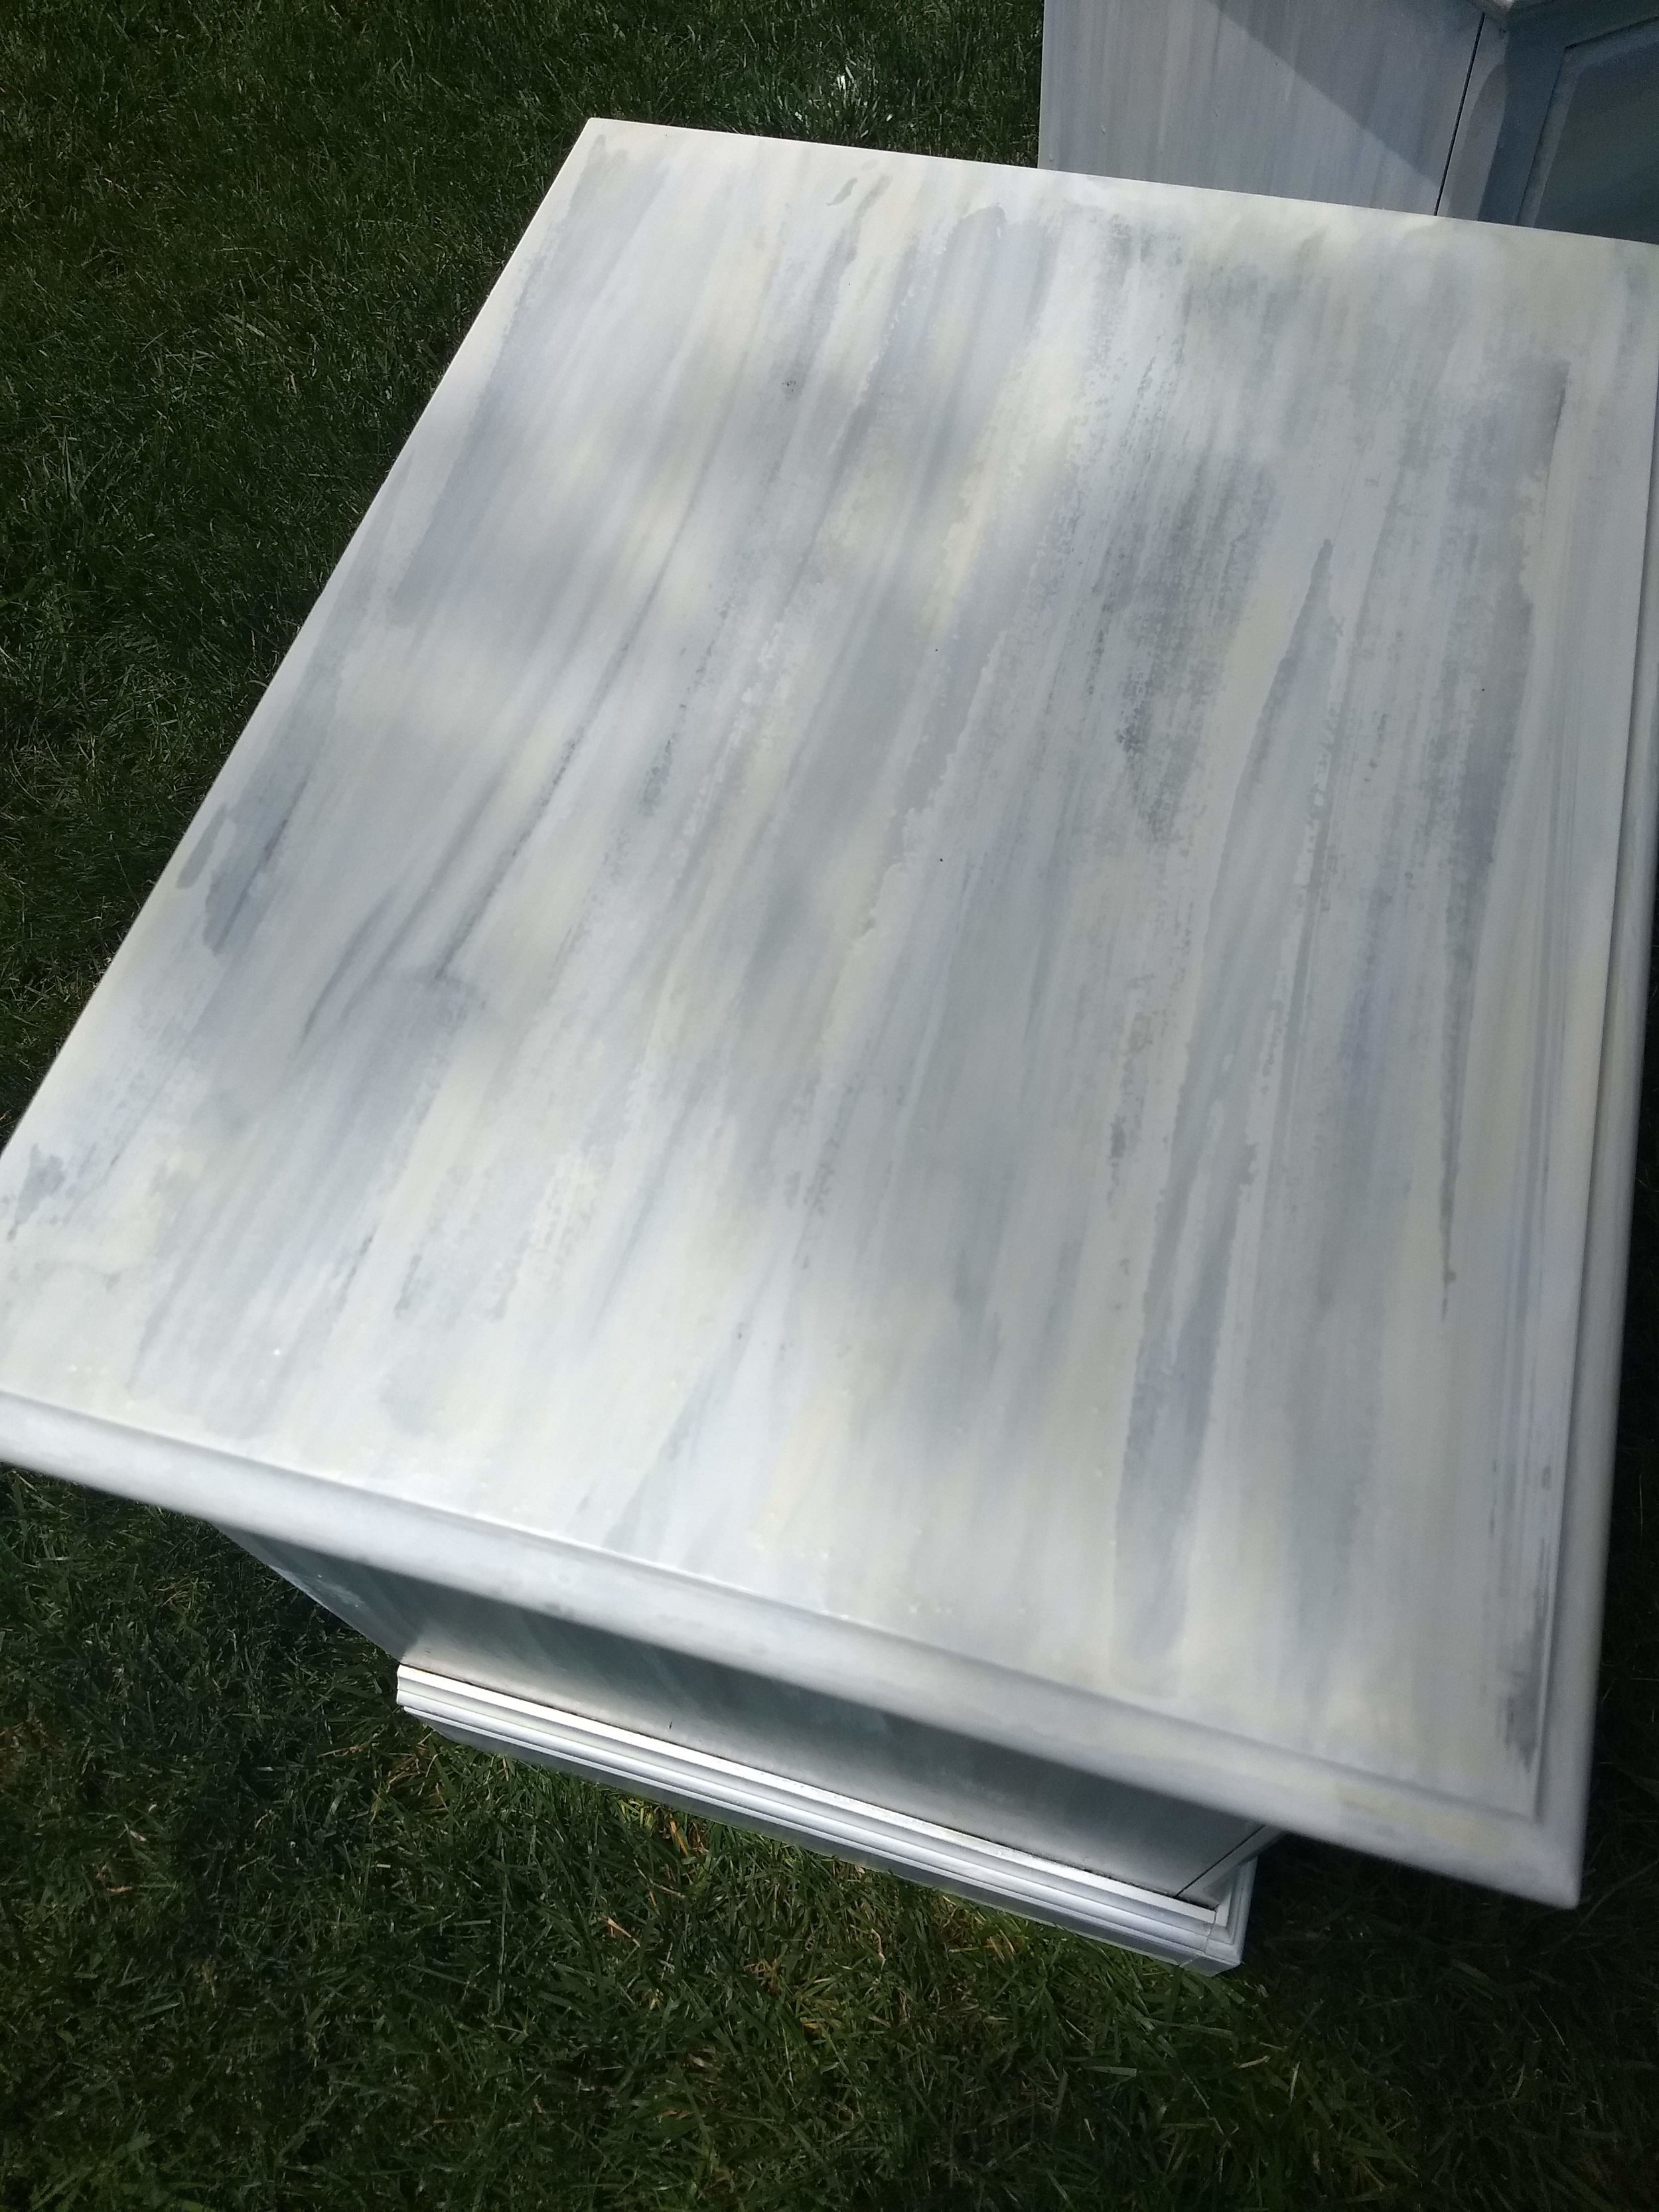
Mix water-based paint with water in a 1:1 ratio (equal parts) for a standard look, or add more paint for more coverage, less paint for less coverage.

Apply the mixture with a paintbrush, wait 1-3 minutes (depending on your color preference), then wipe it off/in along the grain of the wood. I used an old t-shirt which left just enough paint on and let me give nice, weathered streaks. The first coat mostly wiped off, so I left the second coat on for longer and allowed the layers to build.

Be sure to let it dry at least a little (it dries fast, maybe 10 minutes) between coats. For this piece, I applied 6 coats total because I wanted it mostly white. If you make any mistakes, this stuff is incredibly forgiving. Wipe drips with a wet cloth, then do the area again if it gets too light.

4) protective coating

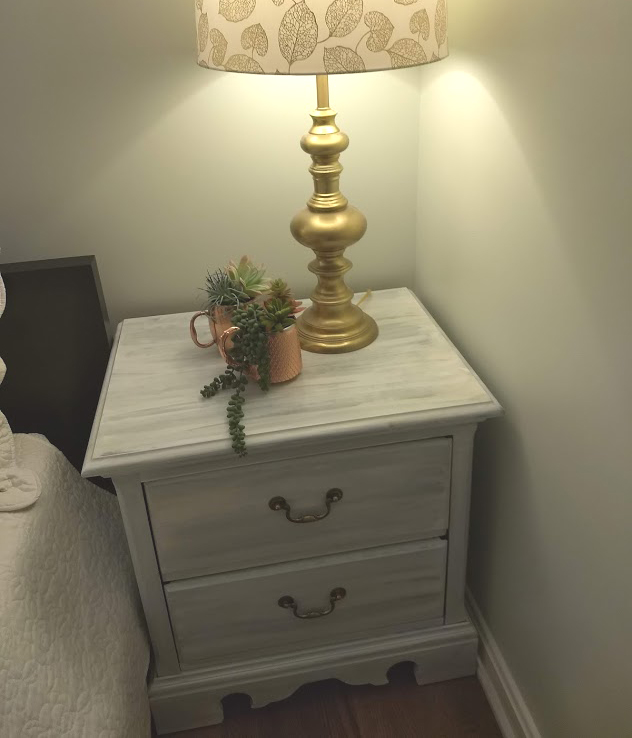
When the paint is good and dry (I waited two hours), apply a water-based polyurethane coat. Because even this reddish cherry wood took on a blue hue, I picked a poly with faint yellow tones, and I’m very pleased with the results. (I use triple thick because it goes on faster, but be careful, it’s prone to brushmarks.) It has both cool and warm undertones, like age wood should. I did one coat on the entire piece, then a second on the tops only (where my books will live), and then a third on the tops of the drawers because the previous stain was pretty cracked there and I had done a lot of sanding in that location.

5) reassemble

I stupidly let paint drip into my drawer rollers, so I needed to do some cleaning (learn from my mistake and don’t do that!), but then all that was left was putting the hardware back on. I would usually have replaced it, but this stuff looks kind of awesome with the white.

IMG_20190621_135905516.jpg
 

Read more…

whitewashing-wood-5-tall.jpg
 

Read more…


Click Here to View the Full Blog Archive.      


furniture transformation: that's one exciting chair (In five Easy Steps!)

thrift-store-5-steps.png
IMG_20181021_143702751.jpg

Inspired by this article in HGTV Magazine, I decided to embark on a fabric furniture mod. I know I’m not ready to re-upholster an entire chair or couch (and frankly, I’ve never seen anyone who wasn’t a professional do a half-decent job at that), so I decided to work with my sewing skills to enhance something for our basement reno.

If you didn’t see my ‘from old to blue’ cabinet rehab, you can read it here.

The focal point of the room is the awesome carpet, now accented by the aforementioned blue cabinet. We waved bye-bye to the old couch that had belonged once to my grandmother, then my mother, then me, and I was looking for something to sit on that wouldn’t cost a fortune.

I thrifted around until one day I found this blue chair. (My son really liked it, so congratulations, you have a five-year-old for scale here!) It was in good shape other than the seat cushion being very worn (on both sides).

It was sturdy and was made of real wood, which is always something I look for when I’m buying used. I love myself some IKEA and HomeGoods, don’t get me wrong, but pressboard has a definite life, and I’m not going to get something to last in my active household if it’s pre-loved and wasn’t quality to begin with.

To begin the transformation, my mom and I went to Hobby Lobby where I picked up fabric that was a trendy pattern but still felt like it worked with the rug (2 yards of Martella). I also picked an accent of a solid darker blue (1 yard of Midnight Venice) and a large teal button (Round Teal Oil Color Coconut Button). Finally, piping cord for inside the edge beading (Natural Cotton - 6 yards). All told, $24.


1) Measure and Cut

Back at home: first things first. I unzipped the old cushion and measured it. The seat top and bottom were pretty worn, so that fabric got tossed. However, I salvaged the zipper for the new cushion and cut strips out of the vertical sides so the beading on the new cushion would match the chair. I wanted it to look like a chair with a great cushion instead of a chair with a new cushion.

First, using my rotary cutter, I cut out the large square pieces for the top and bottom from the Martella fabric. Next, I measured and cut the side pieces: one for the front and 2/3 of each side, then two for the back and 1/3 of each side to incorporate the zipper. That was cut horizontally in half allowing 1” extra for the zipper seam.

IMG_20181024_112958044.jpg
IMG_20181010_162520282.jpg

(Note: Boomer loves the rotary cutting mat. I don’t know why.)

2) Zipper

I attached the zipper to those pieces (and managed to un-zip the pull not once, but TWICE—zippers with no stops are maddening!). Then, I started on the side beading.

3) Piping

Using the blue from the cushions, I made long, 2” wide strips. Pinning them tightly around the perimeter of the first square, I lined it up at the 2/3 point of a side to have all the seams begin and end together. In retrospect, I wouldn’t do it that way again, but too many edges can create too many layers and make your sewing machine angry. But—I learned, so you can live it right when you recover your chair cushion. (Let the beading begin and end separately from where the two vertical edges meet.)

4) Attach Top and Bottom to Side

So, status was: pinned—the 6” deep side piece and the top square sandwiching the blue fabric with the cord bead. I used a zipper foot so I could get it nice and close. I wanted the bead pulled as tight as it could go. After I ran around once, it was still looser than I wanted, so I did a second row (extra strength, right?) even tighter.

I will note here that one thing I’m glad I did was wait to sew both ends of the vertical sides together. I sewed the first one but waited until I came within a few inches on my loop of the top. Otherwise, I don’t think I could have gotten the measurement right. Square corners with that many layers are hard to be exact on, and if each one had only eaten a quarter inch of extra fabric, I would have ended up a full inch off. So I waited to stitch the end off the vertical side (the zipper piece onto the rest of the side) until the side was also completely attached to the top.

Once the top was on, I pinned the bottom. Because of the handy zipper, I didn’t have to leave any room for turning and could sew the whole thing by machine. I am very glad I religiously checked the corners. Nothing would have annoyed me more than to realize I had finished and the corners made the whole thing pull itself in a twist.

I sewed that around using a zipper foot, then did a second loop to get the beading as tight as I could. When I was done, I stuffed the cushion back in and was pleased to see it was a perfect fit!

5) Accent Pillow

Finally, I started on an accent pillow. Using an old BRIGHT red pillow I’d had from years ago that has seen better days, I measured and cut a fun diagonal of the flowered cushion material. Then, using the blue accent solid, I filled in the rest. I attached the front pieces and top-stitched, then attached the back. I used scraps to make a place to attach the button, then stitched it on with contrasting yellow embroidery thread.

I stuffed in the pillow. I waffled on just stitching the top but in the end decided to invisible stitch the top by hand. I always regret this halfway through but had already committed. The pillow was way to fluffy to stitch half and try to get it in.

Ultimately, despite stabbing myself a couple times, I finished the invisible stitch. When I put the pillow in place, I hated the button. I loved the button by itself, but it didn’t work on the piece.

Snip, snip, bye-bye button. I just wriggled it around a bit until the yellow thread ends disappeared inside.

So, the cushion was done, zipped, and pressed into place. Then the pillow was fluffed and dropped until I liked its level of louchiness.

Final result? I’m very pleased!


Click Here to View the Full Blog Archive.      


furniture transformation: $100 from thrift to trendy

furniture-transform.gif

I was walking along the rows of furniture at Salvation Army, knocking my fist along high-pitched, hollow pressboard cabinets talking to my five-year-old when one piece created a deep, solid thud. My ears perked up at the change, and I walked around to the front to inspect the piece. In good shape, but very dated. I opened the first draw and saw a stamp…

42608044_2136237103054773_5588903387367211008_n.jpg

Ethan Allen! Thrifting score! To better my luck, it was half-price day. Woo! I brought my treasure home for the low cost of $68 and a texting fight with my husband who said it was ugly and that it would sit in the garage for a year and then get thrown away.

Honestly, it’s probably good he threw (typed) a fit because it inspired me to get started RIGHT AWAY to prove that I was right.

So, with the help of my gracious neighbor (and not telekinesis like I later told him), I loaded it out of the van and got down to business.

After removing the hardware, my first step was a fail, I’ll admit. I knew I wanted to sand it, so I started to sand it. By hand. With sandpaper. Unfortunately for me (but fortunately for anyone who forgot a coffee mug on their Ethan Allen cabinet), with high quality furniture such as this, the finish is so thick, I barely made a dent. I was using coarse grit sandpaper, too! I did the entire thing… and it looked the same. I even made a trip to Home Depot (the first of three that day!) to get more coarse sandpaper.

Eventually, I remembered we had a rotary sander and a belt sander in the workroom, so I adjusted my Wonder Woman tiara and pulled them out. It was getting dark by this time, so along with the earplugs, I plugged in a work light. I was essentially Ron Swanson with all of the snark and know-how but none of the mustache.

NOW the finish and the stain were coming off successfully. I tore the belt on the sander thanks to weird TEENY TINY square hex screws on the hinges that I couldn’t get off, but I went BACK to Home Depot for another belt. Again, I am woman, hear me roar. It’s fun to walk in there covered in sawdust. No one offers me help when I’m filthy the way they do when I enter in a blouse with skinny jeans and towing children.

So, with a new belt and with the discovery that the rotary sander was really only good for smaller areas the belt sander wouldn’t fit, I skinned that beast. (I regret that sentence. Sorry. Gross, Kell.)

I was so pleased with how the “worn” look of the cabinet stayed and that the finish came off unevenly. It was certainly creating the look I wanted. On my second trip to Home Depot, I stopped by the paint section and picked out an intense blue that I hoped would coordinate with my rug. Also, I had to maintain my Ron Swanson-ness (but barely) when I found this amazing hardware that basically looks like it was made to coordinate with the rug. Thrills!

Also, a brief sweet moment at Home Depot. I use talk-to-text all the time, so while standing in the aisle waiting for the stain to mix, I hit my phone and asked my husband “do-you-have-polyurethane” and a moment later a confused-looking older gentleman reached out a can and said, “I don’t work here but I think this is what you need.” I thanked him and explained I was just asking my husband something on my phone, at which point he smiled a ‘whatever-future-lady’ smile and walked away. Giggles.

PHOTO_20180929_151654.jpg

Thanks to a very hepful gal at the paint counter, I left with this stain and hubby confirmed he had poly at home I could use for the final coat.

So, after a REALLY good cleaning with soapy water to be sure all the sawdust (man-glitter) was gone, I took a deep breath and opened the stain. It. Was. Really. Bright. But I was determined that the vision I had in my mind was good, and I just needed to pursue it. I used the foam roller per the Home Depot paint counter person’s recommendation and wiped with a ever-growing pile of old t-shirts.

The first coat gave me the happy squeals. The color was EXACTLY what I wanted. I decided I wanted it a little deeper, though, so after it dried, I repeated with a second coat the next day. Lots of happy dancing and triumphant “SEE?”-s yelled at my hubby.

I was (and still am) so insanely happy with the worn look this gave me. Since the piece was clearly designed with a ‘worn’ look, I didn’t want to take the entire piece down to the bare wood. Leaving the dark spots achieved a ‘barn find’ kind of look that’s really popular. This is exactly why I did stain instead of paint.

So, after everything was blue (except my hands because I brilliantly remembered to wear gloves), I started on the polyurethane. This was the most nerve wracking part of the process for me. If you’ve ever worked with this stuff, you know that it looks amazing and then when you come back, there’s a million drips and it looks like a drunk monkey did it. Boo! Painstaking process but I completed the first coat (with only a few dog hairs in it), rubbed it down with steel wool, then layered on the last coat on the fourth day.

When it was dry, hubby (who was by this point converted to the belief that this was, after all, a good idea) helped me carry it into the newly remodeled family room for which this was my contribution. It looked so great with the carpet (cue more happy dancing)—I couldn’t wait to add the hardware as the finishing touch!

At his suggestion, we used lock-tight stuff to make sure the kids wouldn’t twist the knobs off. Voila! Done! Four days of hard work and just over $110, and I have a cabinet I love. Super proud of this one.


Click Here to View the Full Blog Archive.